Blog post structure is easy once you have an easy template to follow. Learn the anatomy of creating blog posts that are SEO friendly.
**Disclaimer** The businesses or resources mentioned are not affiliated with Savvy Cali Girl and we have not received any compensation. They are simply helpful resources our Savvy Cali Girl contributors have deemed worthy of a shout out. In addition, all images are the property of the Savvy Cali Girl Blog unless otherwise noted.
Keywords and Keyphrases
You have an idea for a post. That is terrific but stop before you write a single word! Before you can even begin a blog post, research which phrases and words will generate traffic.
If the goal is to have people read your post, there has to be traffic on Google right? People have to be looking for information on that topic. Whether or not you want to monetize is an added layer of complexity that involves the volume, competitiveness of the topic, and the value associated with it.

Researching Keywords and Keyphrases
There are an infinite number of tools and analyzers available to bloggers today. From Ubersuggest, Moz, and Semrush and more there is no shortage of options. First, I tend to strike a balance between the search volume, the CPC or cost per click, the PD Paid Difficulty, and the SD or SEO Difficulty.
Next, there must be some traffic at a minimum and there should at least be some value. One thing to keep in mind is that a keyword or keyphrase can only be used on one blog post. Importantly, it has to be unique to that post.
Finally, I have to choose if I want to compete against big sites with a high domain authority or niche down to capture more specific keywords that may not be as competitive.
In our post, How To Implement An Exceptional SEO Strategy On Your New Blog, we dig deep into SEO principles which also includes the research aspect discussed here.
The Excerpt and Meta Description Define The Content Within the Blog Post Structure
With a keyword identified, write a short excerpt. Answer the why of someone needs to know about what you are writing about or develop that “hook” that grabs the attention of someone scrolling Google. So what is the difference between the two terms?
Meta descriptions are the summaries shown when you Google topics. They entice a potential new visitor to click on your content. Excerpts are used by your blog’s theme and may or may not be shown within your blog depending your theme’s settings.
Because I tend to simplify and streamline as much as possible, I use the shorter meta description as my excerpt as well. Also, I use this as the simple text below the featured image. Since the bots tend to look for a simple “introduction” to the blog at the very beginning, the meta description is already tailor made for this purpose as well.
Definitions of Excerpts and Meta Description Specifications
- A meta description can be as long as 160 characters but anything more and Google will truncate the snippet.
- An excerpt can be longer, 200 characters but has to pass the “stand alone meaning” test.
Titles and Headlines
Titles and headlines are used virtually interchangeably in this post but whatever you call them, their significance cannot be more important. In truth, a title may be the only thing someone sees when scrolling. All platforms also look at headlines as engaging and indicative of the content to follow. If your headline does not relate to the content or the keyword, it’s likely to be interpreted as misleading or even spam like.

Headline Rules of Thumb
- Use your keyword or keyphrase at the beginning if at all possible.
- Write engaging titles with emotional, thought provoking, descriptive words.
- Make sure the title makes sense, reflecting the meta description and content of the blog post.
- Follow the length guidelines by Google, no more than 60 characters or 600 pixels, including the spaces.
- Use an analyzer to check your work like capitalizemytitle.com or CoSchedule’s Headline Analyzer.
The Headings and Subheadings Concept in Blog Post Structure
If you have ever written an outline for a paper in school, this concept will absolutely make sense. The headings and subheadings in blog post structure are quite literally the outline format that Google looks to in order to “skim” your content.
Most new bloggers are unaware that the headings feature, which looks like a formatting choice in terms of the size of the font are, in reality, not at all related to the format of your blog posts. It’s the number one mistake I made in the beginning and everyone new to this type of content tends to make as well. It’s not until you understand SEO that this realization comes to the forefront.
Let’s face it, a lot of new bloggers are obsessed with their content and website structure in the beginning not realizing the impact of blog post structure of headings and subheadings within their content.

Heading Hierarchy and Keywords
Okay, you understand headings and subheadings, at least in concept, right? How do you apply them to your blog post structure? It’s actually fairly easy. The outline of your content determines that structure rather naturally.
H1 – Use only once as your title
H2 – Main sections or topics of your content
H3 – Sub-topics of each section
H4 through H6 Use in very long blog or technical blog posts
The first rule of thumb is to have subheadings for 300 words of content. The Yoast SEO plugin which I use on my WordPress site is critical. It flags long content in need of an additional subheading so I don’t have to count words at all. This plugin also does much more on the SEO to help you as a writer as well guide your SEO development. There are others available also.
Next, intersperse your keyword(s) within the subheadings. Yoast suggests at least 30% but not more than 75% of the subheadings should have your keyword or its synonyms included.
Finally, use those keywords throughout the text of your blog post. Why? I mean, it’s what you should be talking about but your content has to also relate to your subheadings. This is referred to as keyword density.
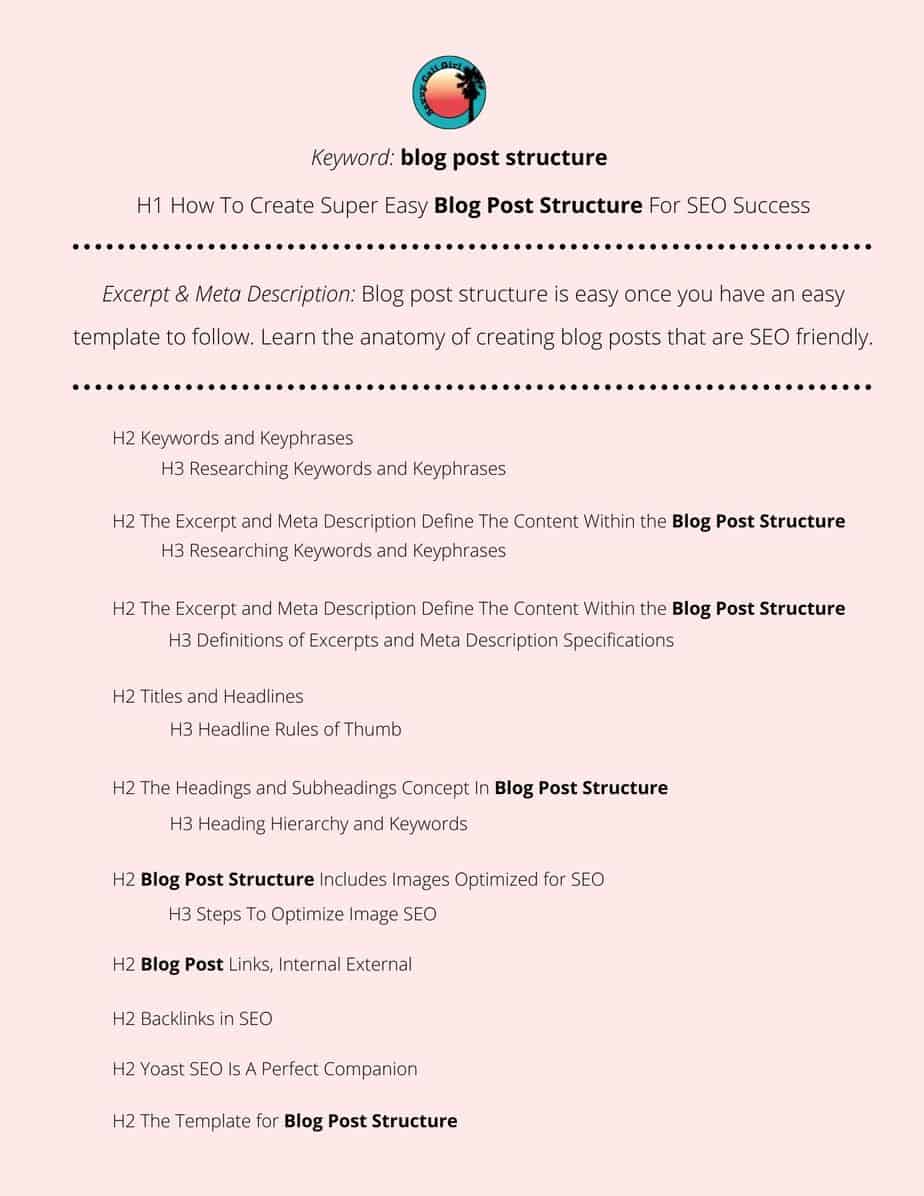
I’ve included the structure of this blog post so you can vizualize how the puzzle pieces fit together. The keyword is in bold.
Blog Post Structure Includes Images Optimized for SEO
While subheadings break up the text, images also serve this purpose, at least visually. This is obvious, right? Pictures can convey so much more than words by themselves in so many circumstances.
The other purpose of images is to help your site with search engine optimization. When your images reflect the topic and/or keywords of your blog post, they can help the link/url and show up themselves with a link to that post. We dug into the details of how to do this properly in a previous post, Simple Steps to Image Optimization for SEO For Bloggers, which I highly recommend.
Keep in mind that Google keeps improving searches so the more that you can add about an image in all the right places, the better your chances to rank. For now the basics and my own process are as follows.
Steps To Optimize Image SEO
Install a plugin to optimize images on your site. There are free versions of many out there but the two that seem to consistently rank well are ShortPixel and Smush, available in free and premium versions.
Before you ad an image to a blog post definitely take a few steps to do it right so your posts have a chance to rank.
- Choose only the pictures needed, editing as needed.
- Size each image to the specifications of your theme, keeping the file size as small as possible.
- Save in a jpeg or WebP format.
- Name the file with a brief description including keywords where appropriate. Don’t over do this. I aim to label about half of the files with the keyword generally.
- Load into your WordPress media Library
- Make sure all fields are completed including alt text, caption, description, and file name. I use the same for all four to streamline my process.

Blog Post Links, Internal and External
There is a lot of tech to ingest on linking within your blog post structure as well as external links to sites not on your blog. Without overwhelming you, the bottomline is that you need both to build a solid SEO strategy for you blog and rank your post.
Just do these three things to get started on each and every post.
- Link to at least one other post within your website. You can do more but use a light hand and make sure they relate directly to the content in a particular portion of your content.
- Link to only reputable external websites. Linking to spammy or junky websites will hurt your ability to rank for a specific post.
- Link both internal and external links with the full https url. This is what Google has specified and what I choose to follow regardless of plugin, theme, or page builder suggestions.

BackLinks In SEO
You remember in school when there were daily little rewards for attendance or good behavior? Good blog post structure yields all those small daily rewards.
Now, once a semester or at the end of the school year, there was an assembly and if you received an award at that time, it was a much bigger deal. Backlinks are the better prize but definitely not an easy accomplishment.
But how do you get these golden awards?
- Create terrific, useful content that other sites will be attracted to. The backlinks will begin to appear as other sites find your content and as your blog gets older, gaining domain authority ideally.
- Never, ever pay for backlinks! It is against Google’s policies.
- Create content for another great website as a guest author. That post will link back to your own site, creating a natural backlink.
- Not all backlinks help so if a terrible site links to you, address it immediately. You can request removal directly with a website or use the Google Search Console Disavow Tool linked here.
Yoast SEO Is A Perfect Companion
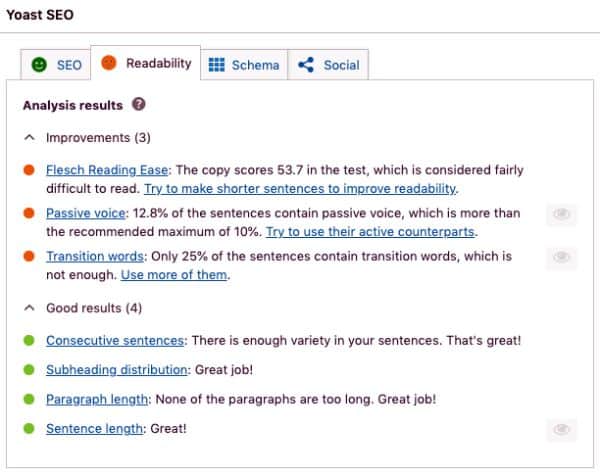
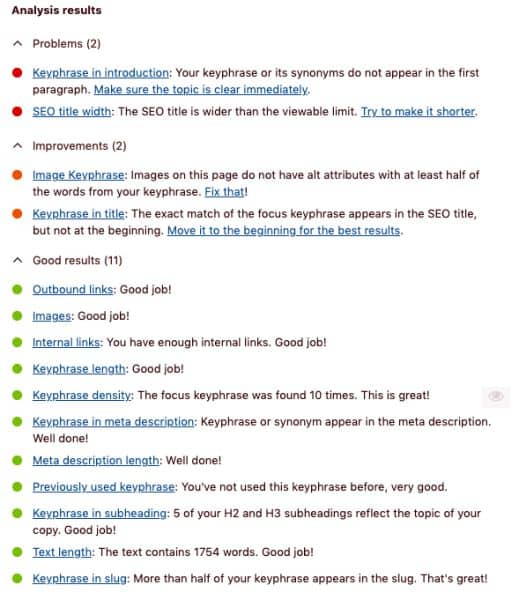
At first, I could not possibly ingest every single recommendation and strategy, but over time the flow seemed to develop. The one tool I would definitely employ as a new blogger is the Yoast SEO plugin. It takes the guesswork out of analyzing your post.
So while I know what to do, execution remains a challenge. The plugin, and others like it such as RankMath, give you an analysis of your post after each save automatically. With easy reminders like green, orange, and red flags, Yoast SEO tells you how the post is coming along.
The suggestions for SEO and readability pop up immediately as you save the draft so there is absolutely no guesswork. Below is a sample of what my post dashboard looks like as it develops.Bothe the SEO and readability cues really do guide the process as you refine the blog post.
The Template for Blog Post Structure
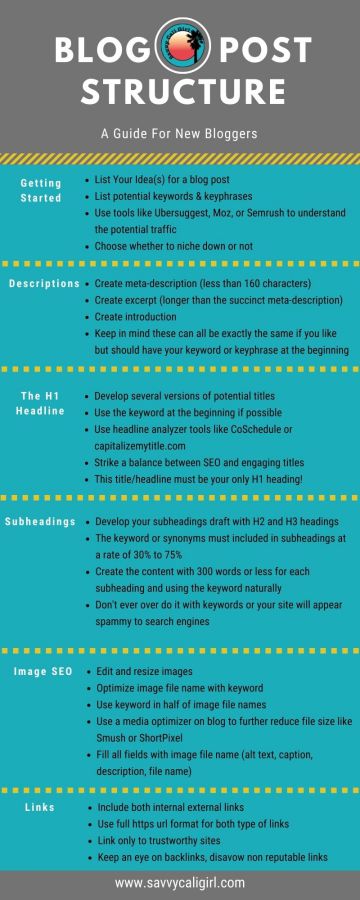
Are you thoroughly overwhelmed? That’s okay, we have a template to help you through the process until it becomes more natural. This infographic summarizes steps to help you get into a natural rhythm as you develop blog posts. Remember, as you develop your skills, you can dig deep into specific areas of blogging to refine aspects of your posts and your blog. This is why developed a blogging category with a series of posts on everything from images, writing styles, SEO, and more.
